
(I'll apologize in advance for the quality of most of these photos -- these are Instagram pics, as I haven't gotten around to taking nicer photos with my DSLR. Sorry!)
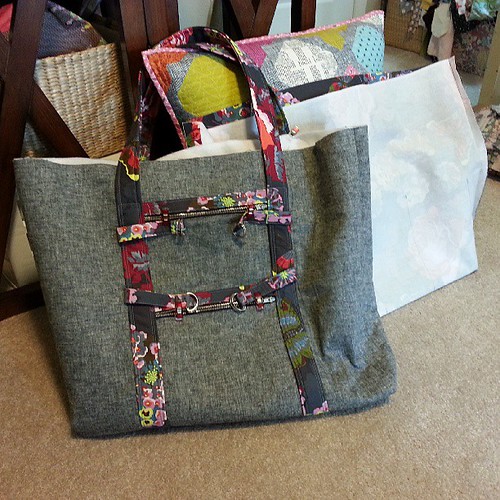
I absolutely LOVE how the bag turned out, but it was a bit tricky at times, so I thought I'd jot down some of the issues I encountered making the bag, any changes I made, etc., that may hopefully help someone else out there making it in the future and googling for tips in the middle of the night (like I did!).
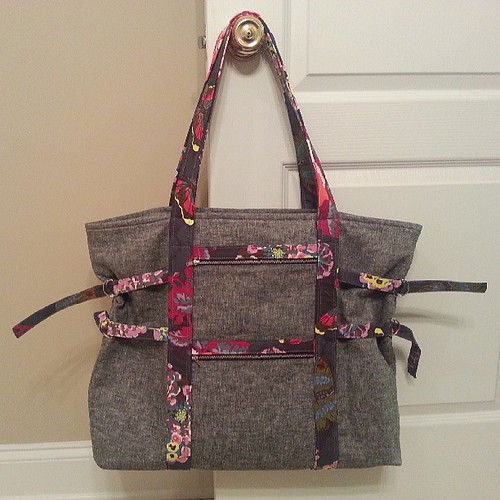
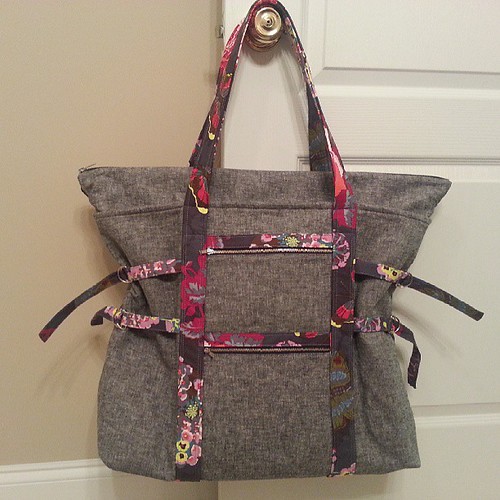
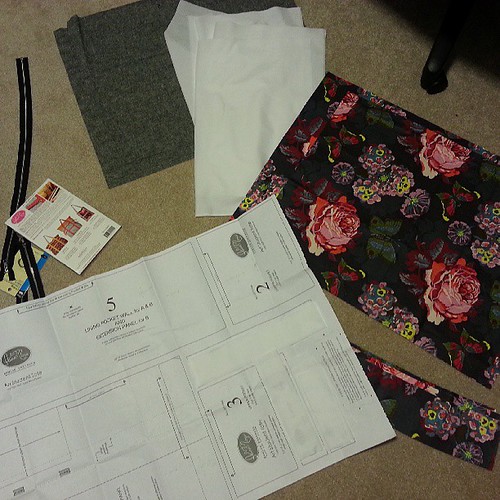
First, I made Option B of this bag. It's the larger, full size bag, with an extension panel (hidden in the picture above, extended in the picture below).
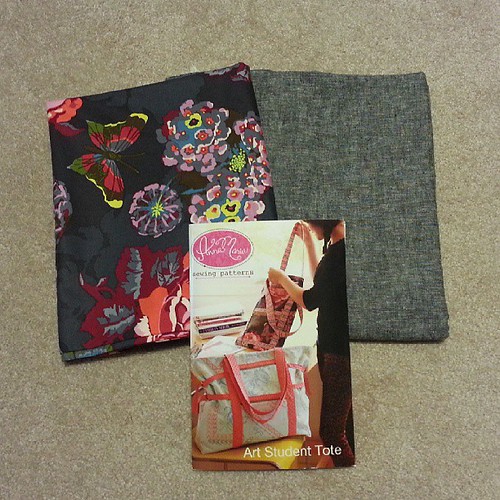
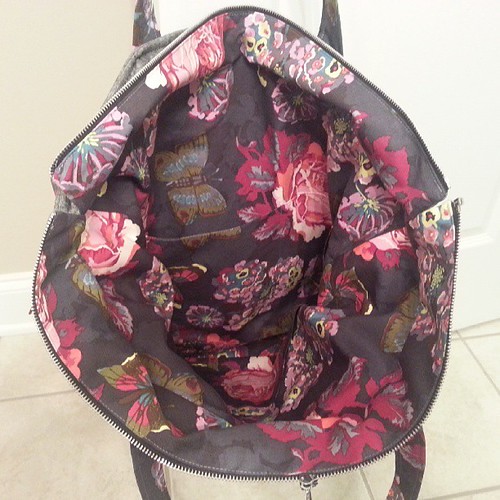
For the fabrics -- I chose to use Essex Yarn-Dyed Linen in black for the outer bag and the outer section of the extension panel, with AMH's Clippings print in the Passion colorway from the Loulouthi line for the straps and lining.
I used metal zippers and D-rings in a silver color. The hardware on this bag is really what makes it, for me it's what takes this bag away from looking "homemade."

I was very inspired by Holly's version of the Art Student Tote, and followed some of her recommendations, especially when it came to interfacing.
Here's what I used for interfacing:
Outer bag pieces --Essex linen with a layer of Pellon SF101, then a layer of Pellon Fusible Fleece.
Two outer pocket pieces -- Essex linen with a layer of Pellon SF101.
For the trim pieces on the two pockets -- quilting cotton with a layer of Pellon SF101.
For the side D-ring straps -- quilting cotton with a layer of Pellon SF101.
For the bag handles/straps -- quilting cotton with a layer of Pellon SF101, then a layer of Pellon Fusible Fleece.
For the lining--quilting cotton with a layer of Pellon SF101.
Lining pocket pieces -- quilting cotton with a layer of Pellon SF101.
In the bottom of the bag, I didn't have any super stiff interfacing (such as Peltex), so I used (I think) two layers of Pellon Craft Bond 808 plus a layer of Pellon Fusible Fleece.
And on that note--cutting all of the fabric pieces and interfacing TAKES FOREVER.
Honestly, I think I spent two or three days just cutting out and prepping all of the pieces (a few hours each day)! So be prepared to spend a while cutting and prepping.
Now, some tips and tricks and things I'd do differently next time:
First, the pattern has you make the D-ring straps by folding a length of quilting cotton in half lengthwise, right sides together, and then sewing it closed across the end and down one long side, and then turning the tube inside out.

To make the four D-ring straps it took me, no kidding, about 2 hours. Turning the tubes was a LONG and tedious ordeal. Never again. If I make this bag again, I would cut the D-ring straps wide enough that I could press the length in half, wrong sides together, then open and fold in each half toward the crease in the middle, then press in half, folding in one short end, and then top stitching down each edge. I honestly believe this would create just as usable a strap, but without the tedious turning of the tube.
Similarly, I would do the same for the long straps that wrap the bag and make the handle. The pattern has you fold that strap piece in half (around the interfacing in the middle) and then press in only a half inch of each side toward the inside before pressing the entire thing in half. Again, the strap would function similarly (and just be slightly thicker from having four full layers of fabric, plus interfacing), if you simply cut the straps wide enough to press in half, then fold each side in to the center crease, and then fold in half.

Next, I didn't make the extension panel the full height. It just seemed like it would be too tall and unwieldy. So I cut my extension panel pieces at 5" tall, instead of the 8.5"or so in the pattern. I like the shorter panel, it gives extra room if needed, but isn't too bulky.
Next, I think my version of the pattern was missing some markings that were supposed to be on the extension panel pattern piece. When creating the extension panel, the pattern mentions sewing from "marks" on the sides of the extension panel pieces, around the corner and across the zipper side, to the other mark on the other side. My extension panel piece had no such marks. I'm not sure if this missing mark has been corrected in newer versions of the pattern or not, I couldn't find any errata for it despite quite a bit of searching, nor anyone else who mentioned this problem. In any event, I simply marked the halfway point on each short side of my extension panel pieces, and used that as the "mark" to start and stop sewing. This worked perfectly well and my extension panel turned out just fine.
A lifesaver -- Clover Wonder Clips. They worked SO well for holding the many layers together while putting this bag together. In the picture below, you can see that at one point I had them holding the various straps clipped in to the bag and out of the way while I was attaching the bag and lining. They are really an absolute must-have in my opinion for a project like this.
One last note -- I think the pattern very generously over-estimates the amount of fabric needed, and I think this may be because of how the pattern has you lay out the fabric for cutting. Rather than following the cutting layout in the pattern, I maximized my fabric yardage but turning some of the larger pieces sideways and cutting them across the width of the fabric from selvedge to selvedge. I was able to cut all the strap pieces, the lining pieces, lining pocket pieces, and the interior pieces of my extension panel from 2 yards of the AMH print. The pattern says you'll need 3.25 yards of lining fabric (for lining, lining pocket pieces and extension panel interiors and exteriors) plus 3/4 yards of contrast fabric for the straps. That's 4 yards of fabric for what I was able to cut from 2 yards (although I did make my extension panel shorter, and only used the AMH print for the interior, and not exterior, of the extension panel). I think you could safely get away with 2.5 yards for the interior, extension panel interior/exterior (in full pattern size), and straps, if you cut your fabric economically.
I think that's about all of the tips/recommendations I have. Overall, I absolutely love how this bag turned out, and I would highly recommend the pattern if you're looking for a HUGE, fun bag. As there were parts of the pattern I found a little tricky, I'd probably recommend this for intermediate sewers with some prior experience making bags, sewing zippers, etc.
If you've made this bag, or are thinking about it, let me know! I'd love to hear about your experience. :)
3 comments:
Thank you for your review, I found it very helpful. I've been looking at this pattern for absolutely MONTHS. I make bags for my dancer daughters who are 22-23 and carry a whack of "gear" to work .. This one has much more style than mine do so I now plan to order the pattern. I have made several of the Professional Tote and that too takes ages to cut out. Your bag looks terrific!
I'm about to make this bag- thanks SO much for all of your helpful tips! Quick questions: if I downsized the exterior by just 2" in length- do you think that would make a big difference? I have this directional horse print but only one yard!
I'm curious if this is one of those projects that you just need to have the pattern to do or if it's simple enough you could do it without? I have a hard time paying $12 for the pattern alone.
Post a Comment