Sunday, April 13, 2014

Scrappy Fair Isle Quilt tutorial

Happy Sunday everyone!

It's been a while since my last post, and since then I've been a busy bee, sewing away.  A few days ago I started a new quilt, and wanted to put up some details on it with a little tutorial, as a few people on Instagram have expressed an interest in making one as well.

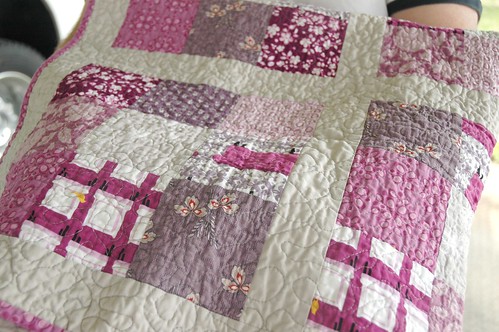
I was perusing Pinterest the other day, and came across a pin of a fair isle knitting pattern that immediately screamed out "quilt!" to me.

Right away, I had the urge to make a quilt with this pattern and colors. I NEEDED to make it!

So I set about breaking it down into manageable blocks so I could figure out how much fabric I needed, how many squares to cut, and generally how to piece it in a manageable way.

Now that I've figured this all out, I'm sharing it here for anyone else who wants to make one!

Scrappy Fair Isle Quilt Tutorial

Fair Isle quilt mosaic

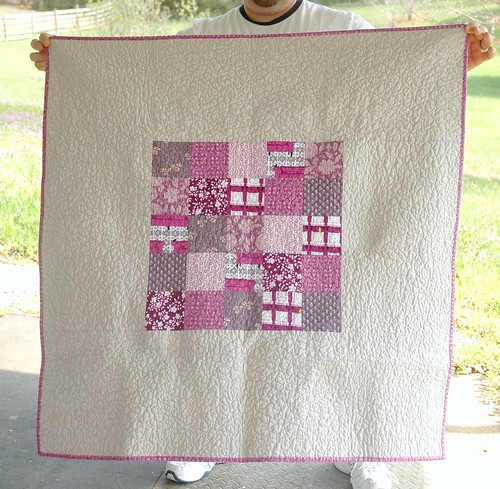
Approx. finished size - 70"x70"

Fabric Requirements:

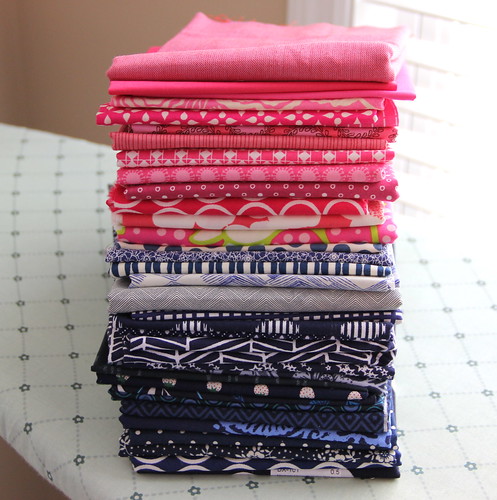
Print 1 (pink) - scraps/pieces equal to 1/2 yd 
Print 2 (gold) - scraps/pieces equal to 2 1/8 yd 
Background (white) - scraps/pieces equal to 3 1/8 yd

Cutting instructions:

Print 1 (pink) - cut 5 strips 2.5" wide x WOF (width of fabric).  
Subcut each strip into 16 squares (for a total of 80 squares).  
If you're cutting from scraps, you need a minimum of 67 2.5"x2.5" squares (but it helps to have more for variety).

Print 2 (gold) - cut 29 strips 2.5" wide x WOF.  
Subcut each strip into 16 2.5"x2.5" squares. (for a total of 464 squares).  
If you're cutting from scraps, you need a minimum of 456  2.5"x2.5" squares.  Again, helps to have a bit extra for variety.

Background (white) - cut 44 strips 2.5" wide x WOF.  
Subcut each strip into 16 2.5"x2.5" squares (for a total of 704 squares).  
If you're cutting from scraps, you need a minimum of 702 2.5"x2.5" squares. 

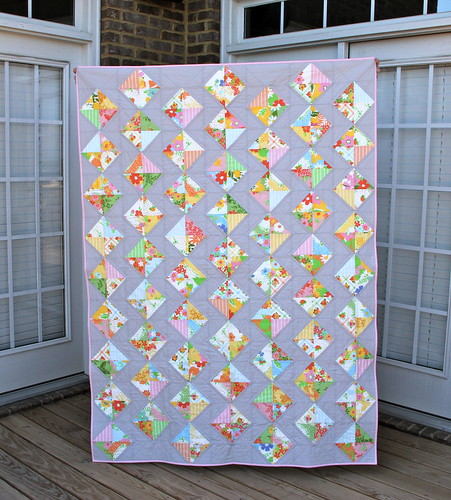
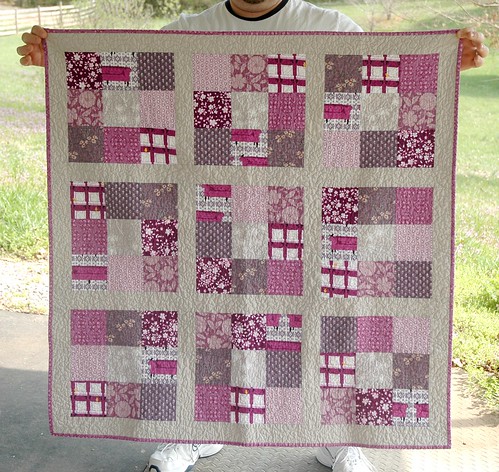
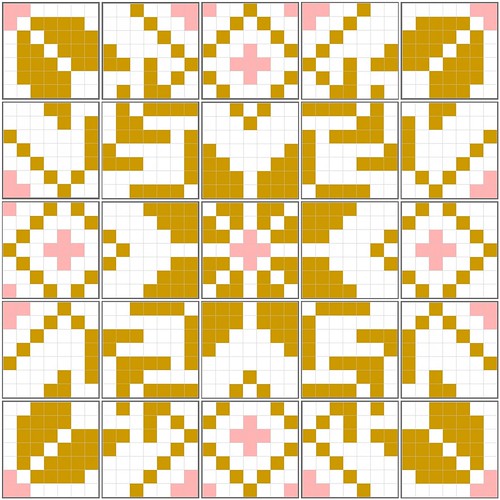
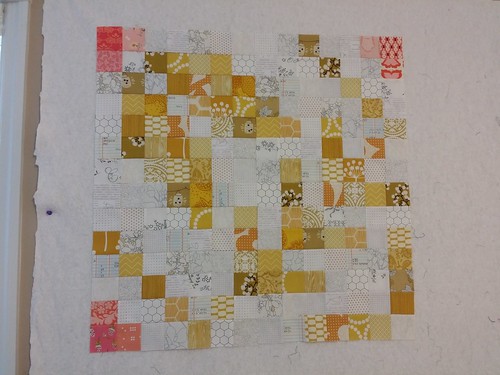
The quilt is constructed in 25 7x7 blocks.  For ease of reference as I created the pattern, I labeled the rows 1-5, and the columns A-E.  So the top left block is 1A, bottom right is 5E, etc.  

In the mosaic above, each block is outlined to make it easy to replicate.  However, if it's easier for you to view a single block at a time, click through to my Flickr account (click the Flickr widget on the right -->) and I have a photo listed of each block, labeled as mentioned above (all the first row are labeled Left to Right 1A-E, second row, 2A-E, etc.)

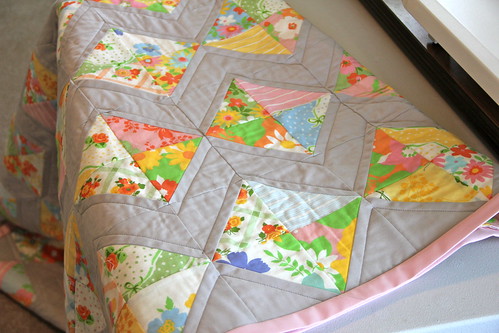
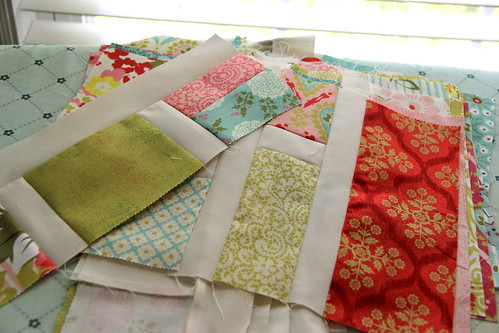
In constructing the blocks, I find it easiest to lay out all the pieces ahead of time, then stack up each row.  I then chain piece the entire block, pressing the seams of each row in opposite directions so the rows next together.  It also helps to try to remember, as you move from block to block, to keep track of the way the seams are pressed in the blocks above and below and on each side so that you can make sure all seams nest  together appropriately when you assemble the blocks together into your quilt top.  I'm sorry I don't have more photos to share as I made the blocks, but I forgot to take photos!

Scrappy Fair Isle Quilt.

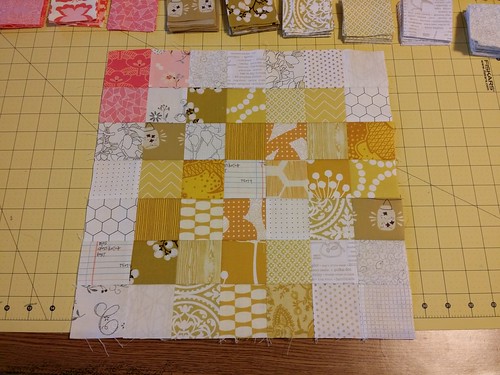
I've started piecing my version, and have a few blocks from the top left corner done so far!  If you want to follow my progress, I'm tagging my photos on Instagram (I'm @JenniferLGB) with #scrappyfairislequilt.

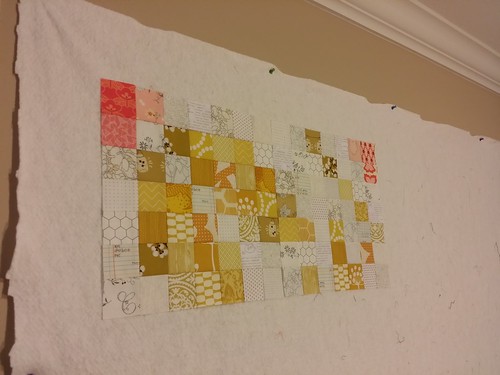
I'm sticking to the mustardy yellow/peachy pink color scheme of the original inspiration photo.  I really love how it's turning out so far and how the pattern slowly materializes as you go!  (Pardon my somewhat crude design wall.)

Scrappy Fair Isle Quilt.

Scrappy Fair Isle Quilt.

Scrappy Fair Isle Quilt.

There you go! I hope this information is helpful to those who may be interested in making their own Scrappy Fair Isle Quilt!  If you are making one, I'd love to see it!  Please leave me a comment, or if you're on Instagram, tag it #scrappyfairislequilt!


Saturday, January 4, 2014

Curved Zipper Pouch tutorial

I figured it's a new year, and time for new projects!

I've been off on vacation for the past two weeks (it's been fabulous!) and had time to work on a few fun little projects.  One thing I've been wanting to do is to try to replicate these very cute Orla Kiely zipper pouches I recently bought at Target.

My first sewing goal of 2014--to try to replicate these Orla Kiely pouches I bought at Target, with their interesting half curved zippers. Time to get started.

For some reason, I really like the way the zipper curves down on one side of the pouch.  It's a unique detail, and makes these pouches a little different from your standard zipper pouch.  I decided to try to replicate the various sizes and curved zippers, and as I was posting pictures of my progress on Instagram (I'm @JenniferLGB over there), a few people expressed interest in a tutorial, so here we are!

I'm going to give measurements for all three sizes of pouch (small, medium, large).  These are pretty darn close to the sizes of the original pouches.  Other than the measurements, the instructions are the same for each size of pouch.

On any of the photos below, you can click on them to go to Flickr and see them in a larger size if you'd like to see in more detail or check something out close up.

Curved Zipper Pouch Tutorial

curved Zipper pouch

My pouch set. I need to work on the shape of the bottom corners, round them some more.


Friday, January 3, 2014

2013 Wrap Up

Well, 2013 is over, and we're three days into 2014, so I thought I'd post a year end wrap up post (even though I've barely posted here this year). It's a good way to keep track of what I made!  (Beware--these are all Instagram photos, so the quality isn't the greatest.)

First, quilts.  I didn't finish as many as I would have liked, but I'm very happy with the ones I did.  I started 14 new quilt projects, as best as I can tell.  However, I only finished 4. And one of those was one I started two years ago!

The finished quilts--

Maple Leaf Quilt


Piece of Cake 3 Quilt


Liberty Churn Dash Quilt


Ruby Pearl and Opal Quilt

Other quilts still awaiting finishing--

Hubby's Scrappy Trip Along Quilt


Weaving the Rails Quilt


Pink Black and Yellow Triangle Quilt


Navy Bear Paw Quilt


Hunky Dory Crazy 9 patch (this only needs binding!)


Quilts I'm Still Piecing--

On a Whim


City Sampler


Steampunk


Navy and Pink Log Cabins


2012 and 2013 Fat Quarter Shop Designer Mystery BOM


2013 Sugar Block Club


Scrap Vomit Quilt


I also made quite a few non-quilt items. 

There were two pillows--

Riley Blake Modern Quilt Guild challenge pillow


Christmas Tree pillow


And tons of bags! I made more bags this year than anything else!

There were two Sew Together bags--

One for me:


And one for a Christmas gift swap with the Knoxville Modern Quilt Guild.


Two Anna Maria Horner Art Student Totes:

One for me.


And one for my sister for Christmas.


A Super Tote for myself:


A sized-down 241 Tote for my daughter:


A Chelsea bag for my sister's birthday:


A sock sack:


And zipper bags:


An appliance cozy:


And a few clothing items:

Rainbow unicorn pajama pants!


A horse skirt!


An Oliver+S Hopscotch knit nightgown.


Here's hoping 2014 is even more productive!

Wednesday, August 7, 2013

Pattern Review - Art Student Tote

I'm coming out of my long hibernation here on the blog to write up a review of a pattern I made recently, the Art Student Tote by Anna Maria Horner.  I have no affiliation with the lovely Ms. Horner (I wish!), I'm not getting paid by anyone to post this, I just wanted to share my experience making the bag!

(I'll apologize in advance for the quality of most of these photos -- these are Instagram pics, as I haven't gotten around to taking nicer photos with my DSLR.  Sorry!)

My #artstudenttote is finally done! This is probably the most  difficult thing I've ever made. But I love it! It is huge. A lot of work, but totally worth it.

I absolutely LOVE how the bag turned out, but it was a bit tricky at times, so I thought I'd jot down some of the issues I encountered making the bag, any changes I made, etc., that may hopefully help someone else out there making it in the future and googling for tips in the middle of the night (like I did!).

First, I made Option B of this bag.  It's the larger, full size bag, with an extension panel (hidden in the picture above, extended in the picture below).

#artstudenttote with extension panel up. My panel is just over half the pattern size, about 5".

For the fabrics -- I chose to use Essex Yarn-Dyed Linen in black for the outer bag and the outer section of the extension panel, with AMH's Clippings print in the Passion colorway from the Loulouthi line for the straps and lining.

Up next.

Inside of my #artstudenttote. Love this @annamariahorner print.

I used metal zippers and D-rings in a silver color.  The hardware on this bag is really what makes it, for me it's what takes this bag away from looking "homemade."

Close up of the front pockets on my #artstudenttote. I love how the metal zippers and hardware make this bag look less 'homemade.' Sorry for the overgramming, I just love how it turned out! Long and detailed review of the pattern coming up on my dormant-f

I was very inspired by Holly's version of the Art Student Tote, and followed some of her recommendations, especially when it came to interfacing.

Here's what I used for interfacing:

Outer bag pieces --Essex linen with a layer of Pellon SF101, then a layer of Pellon Fusible Fleece.

Two outer pocket pieces -- Essex linen with a layer of Pellon SF101.

For the trim pieces on the two pockets -- quilting cotton with a layer of Pellon SF101.

For the side D-ring straps -- quilting cotton with a layer of Pellon SF101.

For the bag handles/straps -- quilting cotton with a layer of Pellon SF101, then a layer of Pellon Fusible Fleece.

For the lining--quilting cotton with a layer of Pellon SF101.

Lining pocket pieces -- quilting cotton with a layer of Pellon SF101.

In the bottom of the bag, I didn't have any super stiff interfacing (such as Peltex), so I used (I think) two layers of Pellon Craft Bond 808 plus a layer of Pellon Fusible Fleece.

And on that note--cutting all of the fabric pieces and interfacing TAKES FOREVER.

Still cutting my #artstudenttote pieces. It's taking forever!

Honestly, I think I spent two or three days just cutting out and prepping all of the pieces (a few hours each day)!  So be prepared to spend a while cutting and prepping.

Now, some tips and tricks and things I'd do differently next time:

First, the pattern has you make the D-ring straps by folding a length of quilting cotton in half lengthwise, right sides together, and then sewing it closed across the end and down one long side, and then turning the tube inside out.

Art student tote straps closeup

To make the four D-ring straps it took me, no kidding, about 2 hours.  Turning the tubes was a LONG and tedious ordeal.  Never again.  If I make this bag again, I would cut the D-ring straps wide enough that I could press the length in half, wrong sides together, then open and fold in each half toward the crease in the middle, then press in half, folding in one short end, and then top stitching down each edge.  I honestly believe this would create just as usable a strap, but without the tedious turning of the tube.

Similarly, I would do the same for the long straps that wrap the bag and make the handle.  The pattern has you fold that strap piece in half (around the interfacing in the middle) and then press in only a half inch of each side toward the inside before pressing the entire thing in half.  Again, the strap would function similarly (and just be slightly thicker from having four full layers of fabric, plus interfacing), if you simply cut the straps wide enough to press in half, then fold each side in to the center crease, and then fold in half.

Getting there! #artstudenttote

Next, I didn't make the extension panel the full height. It just seemed like it would be too tall and unwieldy.  So I cut my extension panel pieces at 5" tall, instead of the 8.5"or so in the pattern. I like the shorter panel, it gives extra room if needed, but isn't too bulky.

Next, I think my version of the pattern was missing some markings that were supposed to be on the extension panel pattern piece.  When creating the extension panel, the pattern mentions sewing from "marks" on the sides of the extension panel pieces, around the corner and across the zipper side, to the other mark on the other side. My extension panel piece had no such marks.  I'm not sure if this missing mark has been corrected in newer versions of the pattern or not, I couldn't find any errata for it despite quite a bit of searching, nor anyone else who mentioned this problem.  In any event, I simply marked the halfway point on each short side of my extension panel pieces, and used that as the "mark" to start and stop sewing.  This worked perfectly well and my extension panel turned out just fine.

A lifesaver -- Clover Wonder Clips.  They worked SO well for holding the many layers together while putting this bag together.  In the picture below, you can see that at one point I had them holding the various straps clipped in to the bag and out of the way while I was attaching the bag and lining.  They are really an absolute must-have in my opinion for a project like this.

I am SO close to finishing! Have the outside and lining complete. Just need to finish the extension panel and then sew the outside and lining together. I will get this #artstudenttote done today!

One last note -- I think the pattern very generously over-estimates the amount of fabric needed, and I think this may be because of how the pattern has you lay out the fabric for cutting.  Rather than following the cutting layout in the pattern, I maximized my fabric yardage but turning some of the larger pieces sideways and cutting them across the width of the fabric from selvedge to selvedge.  I was able to cut all the strap pieces, the lining pieces, lining pocket pieces, and the interior pieces of my extension panel from 2 yards of the AMH print.  The pattern says you'll need 3.25 yards of lining fabric (for lining, lining pocket pieces and extension panel interiors and exteriors) plus 3/4 yards of contrast fabric for the straps.  That's 4 yards of fabric for what I was able to cut from 2 yards (although I did make my extension panel shorter, and only used the AMH print for the interior, and not exterior, of the extension panel).  I think you could safely get away with 2.5 yards for the interior, extension panel interior/exterior (in full pattern size), and straps, if you cut your fabric economically.

I think that's about all of the tips/recommendations I have.  Overall, I absolutely love how this bag turned out, and I would highly recommend the pattern if you're looking for a HUGE, fun bag.  As there were parts of the pattern I found a little tricky, I'd probably recommend this for intermediate sewers with some prior experience making bags, sewing zippers, etc.

If you've made this bag, or are thinking about it, let me know!  I'd love to hear about your experience. :)

Wednesday, October 31, 2012

Blogger's Quilt Festival!

Welcome to my post for the Blogger's Quilt Festival Fall 2012!


I'm sharing a quilt that I've posted about here before, one I made for my new baby boy earlier this year.

Wonky Stars Baby Quilt


I've seen many wonky star quilts on Flickr, and have wanted to make one for nearly as long as I've been quilting.  When it came time to make a quilt for the baby boy I was expecting, nearly immediately I decided on this design.

I was drawn to the aqua, gray and lime color scheme for his nursery, and decided to make the quilt to match.

The star blocks are 9" finished.  Each star block incorporates all three colors - aqua, lime, and gray - in some combination.  One color for the background fabric, one for the star fabric, and one for the thread used to quilt an outline around the star.

Wonky Stars baby quilt


I finished the quilt four days before my son was born this March, just in the nick of time!

I love how it turned out, and I am now taking a picture of my son on the quilt every month to document his growth.  I just know I'll look back on those photos someday and treasure not only watching him grown, but also documenting the quilt I made for him!

Wonky Stars baby quilt


Blogger's Quilt Festival Stats
Finished quilt measures: 36" x 45"
Special techniques used: wonky, improv piecing
Quilted by: me!
Best category: Baby quilt, Home Machine Quilted quilt

Thanks for stopping by!

Saturday, June 30, 2012

Some quick and easy sewing

Since my maternity leave ended and I went back to work three weeks ago, my sewing time has been greatly reduced (obviously!).  Because I only have short its of time here and there, I've made a few quick projects so I could finish something.

First, I had a vision of a small pouch in linen with some Liberty and lace trim.  I decided to use the Inset Zip pouch pattern from Michelle Patterns.  I've made this pattern before and it is fabulous.

After searching through my stash, I decided on a grey Moda Crossweave (linen-like but not linen!), some blue/purple Liberty, and some sweet crocheted trim I picked up at Joann's.

Inset Zip pouch

I LOVE how this turned out!  The strips of Liberty on the front, with the crocheted lace peeking out, are just perfect in my mind.

I used a navy zipper to match.

Inset Zip pouch

And used one of my VERY precious larger pieces of Liberty that I got in my Purl Soho rainbow bundle for the lining.  The piece I had was 9"x12" and was JUST big enough to cut out the two lining pieces for this smaller pattern size.  The lining matches perfectly!!

Inset Zip pouch - lining

I also added a small strap to the pouch, to make it a wristlet.  This isn't part of the original pattern but I added in following instructions from another of my Michelle Patterns.

Well, this first project started the ball rolling.  Next up was an Easy Grocery Bag.

I've got so many half yards of fabric, and a half yard is the perfect size for both the outside and lining of the largest size in the pattern. (Although the pattern says you need a larger piece, you can get away with 1/2 yards for both outside and lining if you use a third fabric for the handles).

Easy grocery bag

I used Alexander Henry Farmdale for this one.  These are the larger scale apples.  How perfect is that for a market bag?

Easy Grocery Bag - lining

The lining is the matching crosshatch from the same line.

And I didn't stop there!  I decided to make a little matching pouch, following Michelle's dumpling tutorial.

Dumpling

So cute! I only had a 12" zipper, so I had to make the smaller "harder" size.  But it wasn't hard at all.  The tutorial was very clear and so easy, and I finished this up in about an hour or two.

Dumpling - inside

Isn't it cute and tiny? I can't wait to make more of these!  Perfect for all those fat quarters you've got sitting around.  I just realized this post sounds like an ad for Michelle Patterns--but I just love them! They're so clear and easy to follow and I've loved everything I've made.

It's so nice to have some quick finishes! I've actually finished one more zip pouch, from a Noodlehead tutorial, but don't have any pics yet.  I seem to be on a zipper kick. I'm about ready to place an order from Zipit on Etsy so I can make more! :)

Saturday, June 9, 2012

Dream On quilt finished!

I finally finished my Dream On quilt!

Dream On quilt - finished!

And I love it!  This quilt has been in the works forever. I started it at the beginning of last year, and of course soon became distracted by other projects.  These last few weeks, while winding down my maternity leave, I vowed that I would finish it before I returned to work! And I did! I just barely made it, finishing it late Thursday evening, and I go back to work on Monday.

It's about 52"x70", made from 4 charm packs of Dream On by Urban Chiks for Moda.  The background is Kona Ash, and the layout of offset diamonds was inspired by this quilt.  I had originally planned to arrange the half square triangles in large concentric diamonds (kind of like this) but as I set out to sew them together I changed my mind!

The backing is yardage of one of the prints from the Dream On collection.

Dream On quilt - back

The binding is a pink Kona from Joann's, I think it's just Pink (or maybe Baby Pink? I don't remember).  I quilted it with gray Gutermann thread, with a light pink Gutermann in the bobbin for the back, and for the machine stitching of the binding.

I love it! And this one is mine, all mine! Well, until my 4 year old daughter steals it from me--with every quilt, it's, "Ooh, mommy, is this one for me?"  If she asks, how can I resist? :)

Thursday, June 7, 2012

In progress

I've got a few projects in progress right now.

First up, I'm almost finished with a quilt I posted about way back when.  I've got the quilting all finished, and today my goal is to sew on the binding.

Dream On quilt

I've already had a few false starts. I'm trying to machine sew the binding, following the tutorial from Red Pepper Quilts, but I'm having some trouble.  My walking foot doesn't have good visibility as far as keeping my stitches in the ditch, I keep wandering onto the binding fabric, and then having to tear it all out.  It's a bit frustrating but I'll keep persevering.

I've got another quilt in progress at the moment as well.  I'm following the Ruby, Pearl & Opal recipe from the Moda Bake Shop, using Basic Grey's Hello Luscious.

Quilt in Progress

I'm about halfway through the last piecing of the blocks, then it will be time to sew the blocks together into the completed top.  I should be picking this up again in the next few days.

And of course, I'm dreaming of new projects.  I've pulled this stack of beautiful navy and pink prints for a new quilt.

My next project

I love this color combo, it's inspired by this photo I saw on Flickr.  I'm thinking scrappy herringbone blocks, following this tutorial.  I don't know when I'll get started, but I'm itching to cut into these fabrics!

I've also got an urge to sew some bags.  I may let myself get distracted by that after I finish up the binding today. I think I need a quick project!

Friday, May 25, 2012

Where have I been?

Hello again!

Oh my, where has the last year gone?  It has been a year, over a year, since my last post.  What happened?

Well, not too long after my last post last year, I got pregnant!  And pregnancy and me--don't agree.  I get very sick and pretty much lose all desire and ability to do anything.  Combine that with a full time job, which I have, and you get lazy evenings and weekends where I did nothing but lie in bed with no energy to quilt or blog.

So the bulk of the last year was spent pregnant and sick and tired.  But happily, in March I gave birth to an absolutely beautiful baby boy, and am now feeling back to my old self.  Unfortunately, two small children plus a full time job (which I'll be returning to from maternity leave in about two weeks) will probably not leave much time for quilting or blogging, but I'm going to try!  My drive to sew is back, although my time may be limited.

I do have one finish to share, and it's one I'm very proud of (I wish I would have thought to blog a few days ago, this would have been a great entry for the Blogger's Quilt Festival).  When I found out I was having a baby boy, I began thinking about color schemes for his nursery and what kind of quilt I wanted to make him.  Because even though I was tired and not feeling great, I was going to muster up the energy needed to make him a quilt!

I decided on a gray, aqua, and lime color scheme, along with a wonky star pattern, inspired by all the beautiful wonky star quilts I've seen on Flickr, but most especially this quilt.  I decided to use the various aqua, lime, and gray mini dots from the Ruby line by Bonnie and Commie for Moda for the backgrounds of the stars, and pulled a big selection of aqua, lime and gray prints from my stash for the stars.  I did a little bit of easy math to figure out the number of each color block to make sure I had an even distribution of colors, and to make sure I ended up with all three color backgrounds and all three color stars.  

And three days before the baby was born, I finished the quilt!

Wonky Stars Baby Quilt

I love it SO much.  It turned out exactly as I envisioned it.

Wonky Stars baby quilt

To quilt it, I quilted on either side of each seam between the blocks, and also outlined each star.  I love the way the quilting looks from the back, as I used an aqua Moda Bella solid for the back, and so the quilting of the stars really stands out.

Wonky Stars baby quilt

I just love it.  It's perfect.  And I'm using it as the background to take monthly photos of the baby to show how much he grows every month.  I know I'll love seeing it when I look at those photos in the future.

So that's where I've been.  I'm hoping that now that things are back to normal, health wise, and we're slowly settling into the new routine with the baby, that I'll have time for quilting and blogging again. I definitely haven't stopped buying fabric (!) so I need to get quilting and use it up!

(And oh my goodness, as soon as I hit publish on this post, I realized it's my 100th post!  How funny! Yay me.)

Saturday, May 14, 2011

Bloggers' Quilt Festival

Amy's Creative Side

Finally, I have a quilt that I can share for the Bloggers' Quilt Festival! I've been around and watched the past few festivals, but never had something to share at the time.

Finished! Purple baby quilt

The quilt that I am sharing is probably my favorite out of all the quilts I've ever made (not that there are that many, but I still love it!). I don't have a clever name for it, I just refer to it as the Purple Nine-patch Baby Quilt.

I was inspired to make this quilt by this one I found on Flickr. I just loved the gray and purple together, and wanted to use that color scheme and nine-patch style. Around the same time, I decided to make a baby quilt for a friend of mine who was expecting a baby. She and her husband are huge Lakers fans, and so I knew the purple (although technically, yes, it isn't Lakers purple) would be a perfect choice for their baby girl.

I collected purple fabrics for some time, picked out a handful that coordinated well, and paired it with some Kona Ash.

For the back, I did one large 5x5 square in the middle, again inspired by the style of the original inspiration quilt.

Finished! Purple baby quilt - back

I quilted it with an allover stipple, and once I washed and dried it, it crinkled up so wonderfully and was sooo soft and snuggly. It was so hard to send it away, but I just know its recipient will love it and get great use out of it.

Finished! Purple baby quilt -closeup

Also, after I shared the pictures of this quilt on Flickr, it was chosen to be shared on the Modern Day Quilts blog, which was great! I felt very flattered!

All in all, it was a super simple quilt to make, but I think the end result is just fabulous!

Thanks again for stopping by!